JI1FGX/DU9 Amateur Radio Diary, Mindanao, Philippines, IOTA OC-130
English Japanese


Yesterdays access
Page Top [Lily Diary.
A diary of life in Mindanao.
26/04/20  WSJT-X Auto Run Ver0.1.5
26/04/08  ESP32-S3 software for using KENWOOD AT-300 with YAESU radios
26/01/08  WSJT-X Remote Operation
26/01/07  JTDX Remote Operation
26/01/04  log_reciver_Ver2.6.6 software
25/11/16  WSJT-X Automatic operation Ver0.1.1
25/11/04  APRS TNC software Ver1.2
25/10/10  APRS TNC software Ver1.0
25/09/23  APRS TNC software
 Dire Wolf with Hamlib
25/08/10  Software List
25/08/18  JTDX Automatic operation Ver0.6.3
 
25/07/20 A program to create one months
worth of ADIF files from JTDX Ver2.6.5
25/07/13 CQ Machine Program Ver1.5_2
25/07/10 AutoCWType_Ver1.4.5
25/07/10 JTDX Autonomous Driving Ver0.4.4
25/06/15 Time setting Ver0.5
25/06/10 Google, DeepL translation API
Using the KENWOOD AT-300 auto antenna tuner with a YAESU radio (2026/04/08)

AT-300_ESP32_S3.zip

Download count: 0

AT-300 Automatic Antenna Tuner Control for YAESU Radios (ESP32-S3 version)
I developed a control system using an ESP32-S3 to enable the use of a Kenwood AT-300 auto antenna tuner with a YAESU radio.
This system uses CAT control via USB connection to acquire the status
of the radio and automatically performs a series of operations necessary for tuning.

■ System Overview:
The ESP32-S3 operates as a USB host and communicates
directly with the Silicon Labs CP2105 (USB-to-serial converter) which has a built-in wireless device.

This enables standalone CAT control without the need for a PC.
The main components are as follows:
  • ESP32-S3 (USB Host)
  • YAESU radio (FT-891 / FTDX3000 etc.)
  • Kenwood AT-300 Antenna Tuner
  • External control signals (TS / TT / SW)
  • I2C connection LCD (status display)
■ Operation sequence.
The process from the start to the end of tuning is as follows:
  • Get the current status of the radio (mode / output).
  • Change the mode to AM.
  • Set the output to a low power setting (e.g., 10W).
  • Start TX (TX1)
  • Tuning is performed while monitoring the TT signal.
  • After tuning is complete, TX will stop (TX0).
  • Return to the original mode/output.

    All processes are automatically controlled by the ESP32, and operation can be completed with a single switch.

■ Technical Features
  • USB Host implementation using ESP-IDF.
  • Direct control of the CP2105 device (custom driver creation)
  • Radio control using CAT commands.
  • Stable operation through state transitions (State Machine).
  • Wireless device status saving and restoration function.
  • Tuning status detection using the TT signal.
  • Error handling and retry mechanisms.
In particular, we have implemented hub control processing to ensure that it works correctly
even with models that have a built-in USB hub, such as the FTDX3000.
■ Special Notes.
  • CAT communication is implemented synchronously, ensuring reliable status acquisition.
  • The tuning mode used is AM (for stable operation).
  • To minimize stress on the radio equipment, always perform tuning at low power.
  • After tuning is complete, it will return to its original state.
 
 
operation
This system is a completely standalone control device designed to link a wireless transceiver and an antenna tuner without the need for a PC.
By combining USB host control and CAT communication using the ESP32-S3, we have achieved a compact and practical solution.

 
ESP32-S3 Pin Assignment 
 LCD (Use I2C)
#define I2C_SDA 8                  // EN: SDA pin

#define I2C_SCL 9                  // EN: SCL pin
 Output/Input
const int pinDISP = 15;   // LED indicator
const int pinTS   = 16;   // AT-300 TS (Tune Start)
const int pinRIG  = 4;    // RIG select (unused now)
const int pinTT   = 6;    //AT-300 TT (Tune status)
const int pinSW   = 5;    //Tune switch
How to Compile
 ESP-IDF v5.5.x or later is required for compilation. (Development environment is v5.5.3)
 ESP-IDF Windows Installer (dl.espressif.com)
 Depending on your internet environment,
selecting the Offline Installer may allow faster installation.
 Extract the ZIP file and navigate to AT300_Controller_Ver0.0.1
idf.py fullclean
idf.py build
idf.py -p COM18 flash monitor
 Please change COM18 according to your environment


LCD 16×2 (LCD1602) and I2C Interface
 
The story behind its development.

The development of this system proved to be far more difficult than initially anticipated.

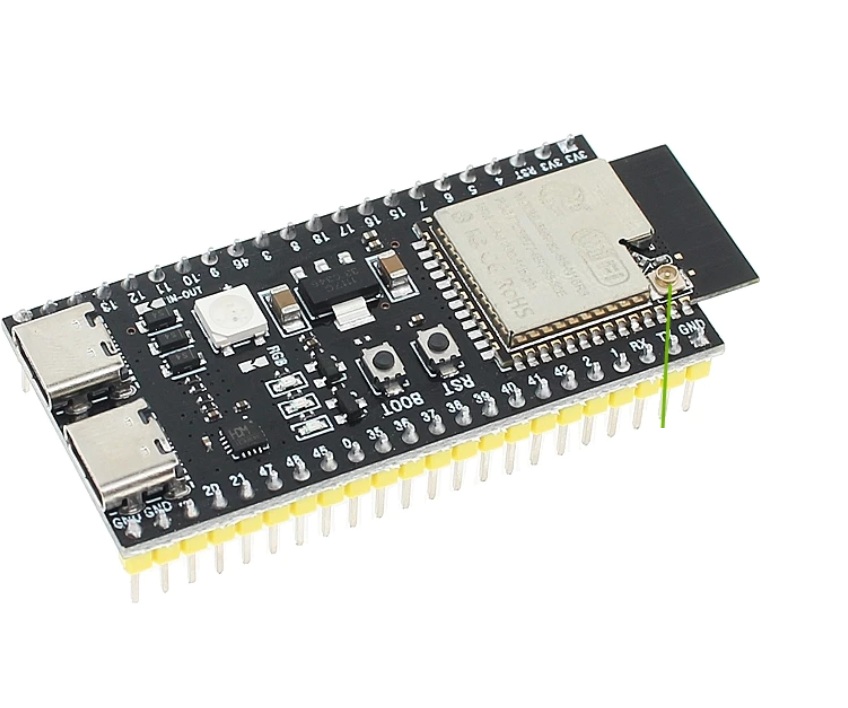
Initially, I had it on hand. ATMEGA32U4 Development began using [this method].
However, the investigation revealed that this microcontroller...USB.Although the port functions as a device,
USB.It has been determined that it cannot be used as a host.

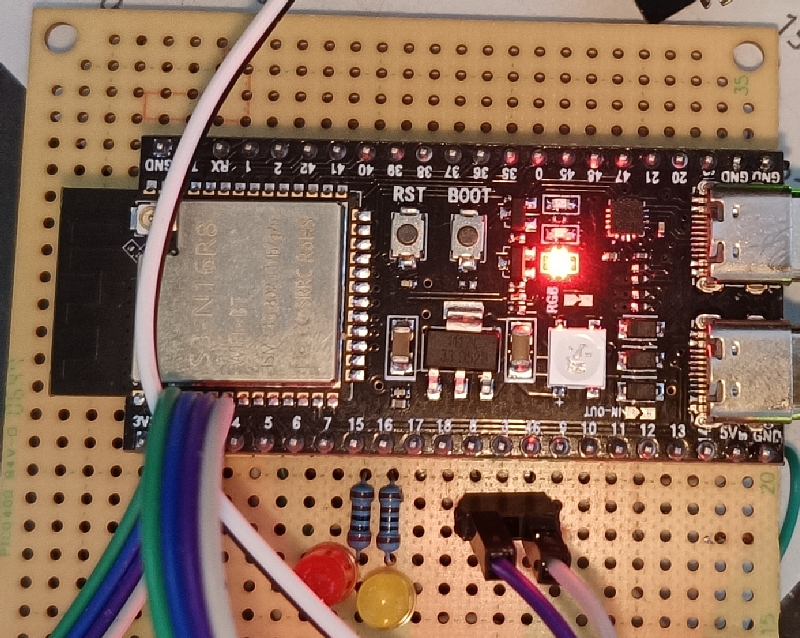
Therefore, respond. ESP32-S3 We purchased [a new product/service] and decided to migrate our development environment.


■ Arduino IDE.from.ESP-IDF.fart.

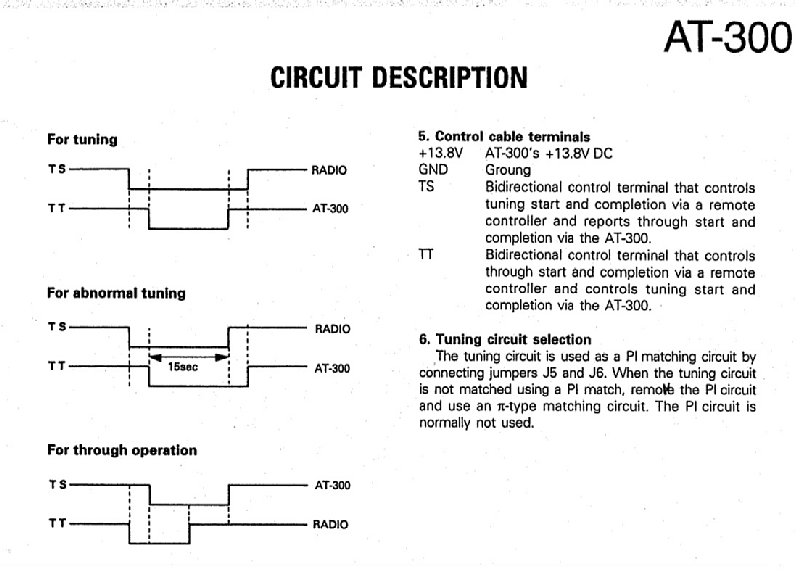
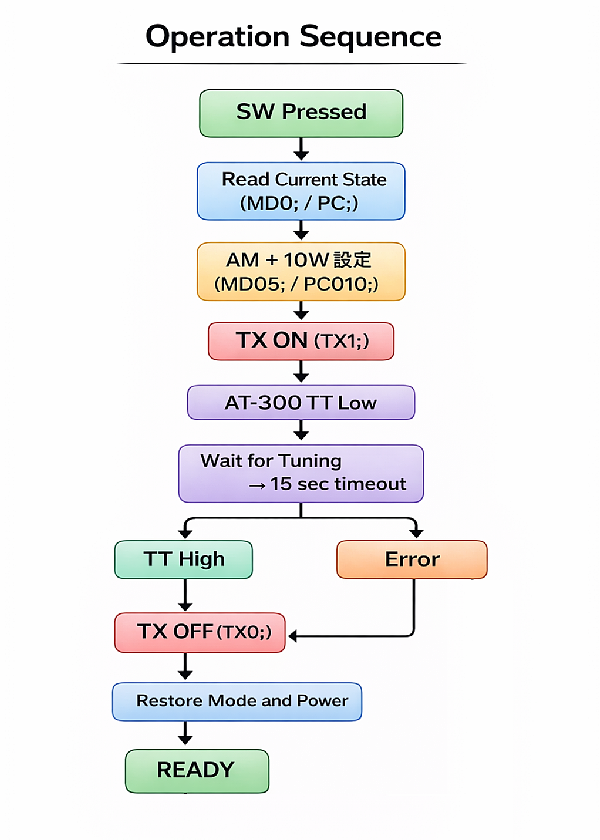
Initially. Arduino IDE Use .ESP32-S3.Create the program,AT-300.Regarding the control section...
We were able to implement it in a relatively short amount of time.

but,YAESU.Radio equipment (FT-891.) and.USB.Due to connectionCAT.
The communication simply wouldn't work, and we hit a major roadblock here.

To solve this problem,Arduino.Leaving the environment,ESP-IDF.Transition to...
C++
With low-level control,USB.We've decided to work on direct communication with the device.


■ CP2105.Making your own screwdriver.

YAESU.Radio equipment.USB.The interface includes:Silicon Labs.Made by. CP2105 It is being used.
but,ESP32-S3.For use.CP2105.The driver.GitHub.I couldn't find it even after searching above.

So the final choice was,Linux.This method involves referring to the kernel source code.

Linux.Driver (cp210x.c.) read the data and extract only the necessary processing,ESP32-S3.Reimplemented for this purpose.
This task takes approximately...5.It took several days, but the result was...FT-891.That.CAT.Communication successful.


■ FTDX3000.and built-in.USB HubThe wall.

next.FTDX3000.When we tested it, we encountered an even bigger problem.

FTDX3000.So,CP2105.In front of it.USB Hub.It was discovered that it was built-in,
The system was designed in such a way that communication could not be achieved through simple device connections.

Even after repeated trial and error,HUB.It lies beyond that.CP2105.Unable to communicate with them,
development comes to a complete standstill.


■ HUB.Driver transplant.

To solve this problem, once again...Linux.Returning to the kernel, this time... hub.c Analyze it.
USB Hub
The processing required for control.ESP32-S3.I transplanted it to [location].

USB.It was an extremely painstaking process, involving meticulously checking each step,
such as enumerating ports, controlling ports, and recognizing devices, as we proceeded with the implementation.


The moment I almost gave up.

During development, we encountered numerous dead ends, and there were times when we couldn't see a way to resolve the issue.

Each time.ChatGPT.from"ESP32.Instead,Raspberry Pi 3 or. Zero 2W I was told, "Wouldn't it be easier to use [this method]?"

In fact, I was often advised to go in that direction, and there was a time
when I seriously considered whether I should change my environment.


about.30.After days of trial and error.

nevertheless.ESP32-S3.Determined to achieve it, and after much trial and error,
about.30.After several days of development,FTDX3000.But I've now completed a driver that works correctly.


Looking back.

This development is

  • USB.Host control.
  • Linux.Kernel analysis.
  • Porting device drivers.
  • Control design using state-based machinery.

This involved delving into a very deep area within embedded systems development.

As a result,ESP32-S3.On its own.YAESU.Connecting the radio and antenna tuner,
We were able to realize a completely standalone control system.

I feel that this experience has become an extremely valuable technical asset.

 March 17, 2026.   April 10, 2026.