| English | Japanese |
|
|
Yesterdays access |
| Page Top | [Lily Diary.】 A diary of life in Mindanao. |
| 26/06/01 | Weather Monitor soft |
| 26/05/21 | JTDX Auto Run Ver0.7.6 BUGFIX |
| 26/04/20 | WSJT-X Auto Run Ver0.1.5 |
| 26/04/08 | ESP32-S3 software for using KENWOOD AT-300 with YAESU radios |
| 26/01/08 | WSJT-X Remote Operation |
| 26/01/07 | JTDX Remote Operation |
| 26/01/04 | log_reciver_Ver2.6.6 software |
| 25/11/16 | WSJT-X Automatic operation Ver0.1.1 |
| 25/11/04 | APRS TNC software Ver1.2 |
| 25/10/10 | APRS TNC software Ver1.0 |
| 25/09/23 | APRS TNC software Dire Wolf with Hamlib |
| 25/08/10 | Software List |
| 25/08/18 | JTDX Automatic operation Ver0.6.3 |
| 25/07/20 | A program to create one months worth of ADIF files from JTDX Ver2.6.5 |
| 25/07/13 | CQ Machine Program Ver1.5_2 |
| 25/07/10 | AutoCWType_Ver1.4.5 |
| 25/07/10 | JTDX Autonomous Driving Ver0.4.4 |
| 25/06/15 | Time setting Ver0.5 |
| 25/06/10 | Google, DeepL translation API |
| Program to create one month's worth of ADIF files from JTDX (2025/08/10) | ||||
|---|---|---|---|---|
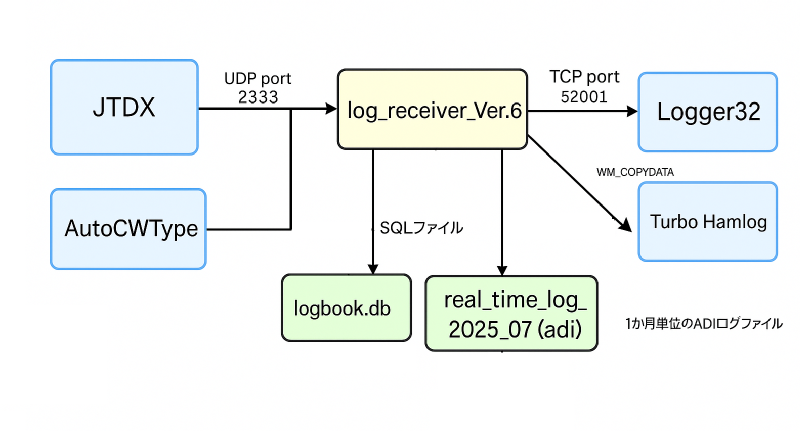
| log_reciver_Ver2.6.5 program that automatically creates monthly ADIF files from JTDX
log_reciver_Ver2.5.zip. |
||||
 |
||||
 |
||||
 boot. |
||||
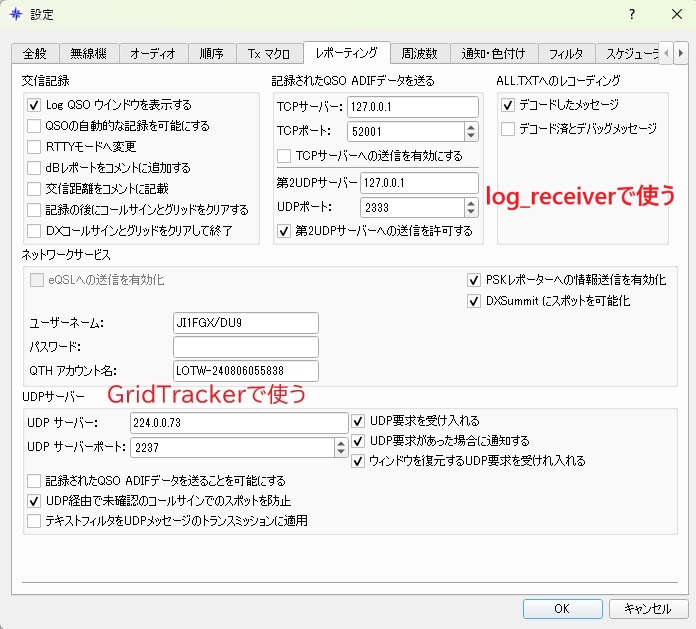
| How to use Once launched, it runs in the background Configure a second UDP server in JTDX 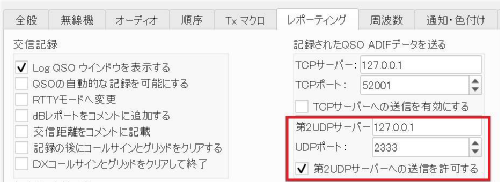 In WSJT-X, you would configure a second UDP server like this: 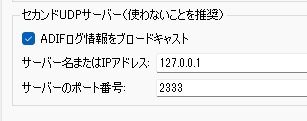 Monthly ADI files such as l real_time_log_2025_05.adi will be created in C:\Logs I use it to submit to the QSL manager. A file called logbook.db will be created. This is a SQL file to be used in a future log search program (currently under development). |
||||
|
How to start. You can start it from the desktop icon or use the task scheduler to have it start automatically when you start your computer. |
||||
 |
||||
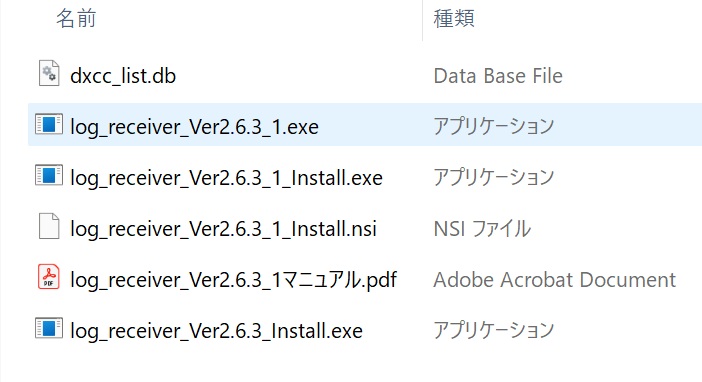
| Restart your computer and search for log_receiver_Ver26.1.exe in Task Manager. Now, if log_receiver_Ver2.6.3_1.exe is present, it will start normally. 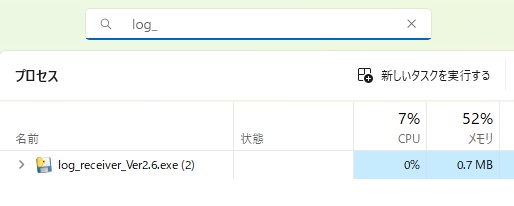 |
||||
When you actually communicate CW with JTDX or WSJT-X FT8 or FT4 using AutoCWType, the update date and time will change and the size will increase. |
||||
| log_receiver_Ver2.6.5 sends data to Logger32 and Turbo HAMLOG. At that time, add the country name to the QTH field and send it. This is convenient because JTDX etc. do not send the country name. Also, send the IOTA No. to Logger32 (currently in trial operation).  |
||||
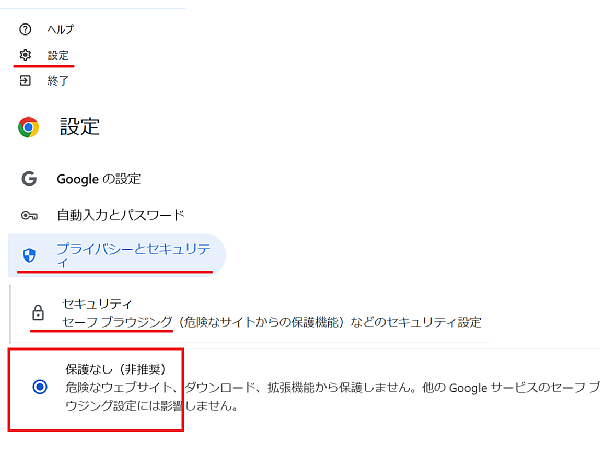
The program is written using a UDP port. If you are unable to download the program due to a virus check, please try the following settings.Steps to add exclusions (Windows 11)
 |
||||
| July 20, 2025. June 8, 2025. | ||||
